Before this I also having this problem when repairing pc's so you need to follow the step below to start safe mode after to configure you pc. It should be solve your problem.
1. Click start
2 .Click run
3. Type msconfig and hit enter
4. Click the radio button for Diagnostic Startup
5. Click apply and close
6. In the dialogue box that appears click restart
7. When windows restarts you will be in safe mode
8. Minimize the window and run your programs
9. When you are done, go back to normal startup.
Thursday, December 17, 2009
Hdd low level format
This tools i founded to make low level format. It's easy to use the software.
to download the tool click here try it..
to download the tool click here try it..
Tuesday, December 8, 2009
My laptop cannot connect to wireless and problem ip addresses
I had repair someone laptop that using celcom broadband before this. His computer cannot connect to wireless signal. I though problem with ip address and I renewing the ip addresses but still having a problem.Below is ways to solve it..
- Hover your mouse to My Computer(for win XP) or Computer(win vista and win 7)
- right click and go to the properties..
- If you are using Win XP click to hardware tab after that click Device Manager and for Win Vista and Win 7 just click to the Device Manager

- After that just install the driver back
- It's easy right?No need to headache to find the solution..good luck!

Sunday, November 22, 2009
how to view routing table
Sorry for long time not posting new entry..
This is the ways to view your routing table...
This is the ways to view your routing table...
- click start > Run
- type cmd on the textbox area
- after appear Command Prompt window
- type netstat view
Sunday, November 15, 2009
how to renew IP address
This is the simple ways to get unique IP address..
- Go to Run -> type cmd -> ipconfig /release -> ipconfig /renew
- Turn off your modem for 15 second ->delete all cookies in your web browser
- Restart of Shutdown your PC.
Saturday, November 14, 2009
Hamachi
What is Hamachi? Hamachi is one of software use to connect other computer on WAN..I will show how to setup Hamachi on your pc..Let's do it now..
Friday, November 13, 2009
Nuffnang Team
Kindly please leave your link cause I wan to bookmark it..So it's easy for me to shoot your nuffnang and I will put your link behind the entry...
don't forget to click my nuff everyday I will hit you back
Thursday, November 12, 2009
How to remove autorun.inf from USB Drive
After I make some research I found new ways to remove autorun.inf from your USB drive or flash drive.

- Open the My Computer from your desktop or start up menu
- Click View and go to Folder Option
- Click on View tab
- Change to show hidden files, folders and drive
- Unchecked the Hide empty drives in the Computer folder
- Unchecked the Hide the extensions for known file types
- Unchecked the Hide protected operating system files
- Click Apply and followed OK button on below
- Open your Flash Drive from search bar
- Lastly press Shift+delete to permanently delete file name autorun.inf
To all my friends
Beside the entry have a link to my other blog..pease visit and be my follower..thanks for supporting me..
Wednesday, October 21, 2009
Apache http Server
Hye guy! we meet again. Today I just want to help my knowledge how to setup Apache http server. Maybe you can refer to the youtube.com but you need to find the video first if you refer to me just below my post I already put the video to you just refer to the video.
Okay let's say you want to setup the Apache. I give you some simple instruction to follow
Good luck my friend, kindly all you can give some response / feedback.
Okay let's say you want to setup the Apache. I give you some simple instruction to follow
- Download the Apache http from apache.org or click this link for windows only: click here
- Open the installer and setup it
- When chage on the network domain field to the localhost
- Change also the server name to localhost and Administrator Email address to admin@localhost
- After that click next and wait for the installation finish
Good luck my friend, kindly all you can give some response / feedback.
Tuesday, October 20, 2009
Drive Protection
Follow the instruction to remove a trojan and make a drive protection. This will remove the autorun.inf from executing in your system.
follow this instruction :
follow this instruction :
- Click Start -> Run.
- Type notepad and press Enter.
- Copy all the text below into Notepad.
@echo offset drv=c:\attrib -A -H -S -R %drv%\autorun.infdel \\.\%drv%\autorun.inf\"lpt3.This folder was created by Flash_Disinfector"rd %drv%\autorun.inf - Save this as remove_fd.bat to your Desktop (remember to select Save as file type: All files in Notepad).
- Double Click remove_fd.bat and wait for the dos window to close and file.txt will appear on the desktop.
- Repeat previous steps to all drives, make replacing c with the appropriate drive letter.
This is a program designed and developed by sUBs (author of combofix) to clean autorun.inf Trojans that are executing on the system.
Intrusion Detection Systems
what is intrusion detection systems?what is use for?how we can get it?what are the software?
Intrusion detection systems is one of the ways you to protect you network from being attack by hacker or cracker. Intrusion detection system means to differentiate between an authorized entry and a malicious intrusion. There are two types of intrusion detection systems that is signature-based and heuristic-based. Intrusion detection systems also known as IDS.
Snort are one of the intrusion detection systems famous software but it hard to configure. How it's work? Snort also will tells you where are the attack came from and lot of more. This software also can terminate the connection the suspicious events.
You can download this kind of intrusion detection software from www.snort.org. How to configure this software? You can refer this video below or you can get the instruction from snort.org.
Sunday, October 18, 2009
Troubleshoot Window Vista
To run the System File Checker tool, follow these steps:
To restore the operating system to an earlier point in time, follow these steps:
- Click Start
, and then type cmd in the Start Search box.
- Right-click cmd in the Programs list, and then click Run as administrator.If you are prompted for an administrator password or confirmation, type your password or click Continue
- At the command prompt, the following line, and then press ENTER:sfc /scannow
To restore the operating system to an earlier point in time, follow these steps:
- Click Start
If you are prompted for an administrator password or confirmation, type your password or click Continue.
- In the System Restore dialog box, click Choose a different restore point, and then click Next.
- In the list of restore points, click a restore point that was created before you began to experience the issue, and then click Next.
- Click Finish.
Sunday, September 27, 2009
Missing Start Menu
I found this way to solve your problem..
- to download this taskbar tool click Here...
- if you can't fix this problems try to use window CD to repair the problem.
- refer to this website Click Here
- If all the step can't help you anbd there is no other ways, you need to make a backup and format.
Thursday, September 10, 2009
Problem with office?
Microsoft now offers an in-house physician. MS Diagnostics is a tool included with the Microsoft Office2007 system that runs a battery of tests which can let you know about the problems and help you with ways that to solve them. You must have run into Microsoft Office2003’s Detect and Repair features; MS Office Diagnostics is like a MRI Scan to the former’s X-ray. It gives a more thorough run over to your system with better repair choices.
MS Diagnostics sizes up your system by running these scans,
* Setup Diagnostic
Files and the registry are scanned for glitches commonly caused by viruses and faulty installations. This test can take up to 15 minutes or more as it goes into the very nerve center of the computer.
* Disk Diagnostic
This diagnostic test scans the hard disk for potential problems. It looks at the Windows system event log and the SMART (Self-Monitoring, Analysis and Reporting Technology) feature of your hard disk if available. This test is sure to let you know if the hard disk is headed for a crash.
* Memory Diagnostic
This checks up on the stability of the RAM.
* Update Diagnostic
This is an update check – does your computer and your Office suite have all the updates installed? It is important as official updates smoothen out the bugs and make the system more stable. This test is available only if Check for Updates is enabled for the Office suite.
* Compatibility Diagnostic
Sometimes you may have different versions of the same Office application installed or conflicting DLL files might be causing the errors. The compatibility test checks for this and nails the problem factor.
* Check for known solutions
This test uses the vast database of Microsoft’s crash cases and their possible solutions to offer a similar for you after reviewing the crash reports on your system.
Now, let’s diagnose…
Though it sounds like a very serious piece of work, in practice it’s not. That’s a hurrah for Microsoft’s user friendliness. Before running the tests, close all open programs and avoid using the computer for the duration of the check-up.
1. MS Office Diagnostic can be found under the MS Office tools group menu.

2. MS office Diagnostic window opens to inform the user that the test may take up to 15 minutes and also connect to Microsoft’s servers. Click on continue.

3. This window displays the tests that will be carried out. Begin the scan by clicking on Run Diagnostic.

4. The diagnostics will run one by one and notify you of any glitches detected. This should ideally complete in less than 10-15 minutes if there aren’t any errors.

5. At the end of the diagnostic run, a summary of results is displayed. Here, perhaps is the only significant catch in the tool – it does not give the specific error. The diagnostic tool can make some repairs to the installation. Clicking on continue will connect you to Microsoft’s vast information resource of problems and solutions. You can follow its recommendations to resolve an error if the repairs fail.

The above steps diagnose the entire Office suite. To save time, you can shortcut the process and have the tool check up on a single Office application. For instance,
* Diagnostics on MS Word can be accessed from: Microsoft Office Button – Word Options – Resources
Similarly for MS Excel/MS Access/MS PowerPoint, the tool can be accessed from: Microsoft Office Button – [Office Suite] Options – Resources
* For the others like MS Outlook/MS Visio/MS SharePoint Designer/MS Project/MS Publisher, the path is: Help – Office Diagnostics
Note: If all the above options fail to open MS Diagnostics, you can access the application directly from its location – C:\Program Files\Common Files\Microsoft Shared\OFFICE12\ offdiag.exe
After a run of MS Diagnostic tool, the problem may or may not get resolved. But Microsoft Diagnostics packs in a rapid detect and fix mechanism which gives us a ‘crash’ course in Office repair.
Missing languange bar
You may be able to restore your language bar with the following registry entries (place the following lines in a file called fix.reg and use that.):
Windows Registry Editor Version 5.00
[HKEY_CLASSES_ROOT\CLSID\{540D8A8B-1C3F-4E32-8132-530F6A502090}]
@="Language bar"
"MenuTextPUI"="@%SystemRoot%\\System32\\msutb.dll,-325"
[HKEY_CLASSES_ROOT\CLSID\{540D8A8B-1C3F-4E32-8132-530F6A502090}\Implemented Categories]
[HKEY_CLASSES_ROOT\CLSID\{540D8A8B-1C3F-4E32-8132-530F6A502090}\Implemented Categories\{00021492-0000-0000-C000-000000000046}]
[HKEY_CLASSES_ROOT\CLSID\{540D8A8B-1C3F-4E32-8132-530F6A502090}\InProcServer32]
@="C:\\WINDOWS\\system32\\msutb.dll"
"ThreadingModel"="Apartment"
[HKEY_CURRENT_USER\Software\Microsoft\Windows\CurrentVersion\Policies\Explorer]
"NoSaveSettings"=dword:00000000
[HKEY_CURRENT_USER\Software\Microsoft\CTF\LangBar]
"ShowStatus"=dword:00000004
Saturday, September 5, 2009
How to enter you computer if forgot password
First way
Second way

- Reboot your machine.
- Press F8 before the Windows boot screen appears.
- Do not press F5 as used on the NT/9x series of Windows.
- You will be be prompted with a boot options menu.
- Select the Start Windows in Safe Mode option.
- Click through several self-explanatory screens until your reach the familiar 'Welcome' screen.
- Note that this welcome screen is limited to 256 colors and 640x480 resolution because the primary graphics will have been set to the Windows Safe Mode software VGA adapter. You will not be able to change this mode even in Display options, while Windows is running in Safe Mode.
- Find the icon for the Administrator user. If the default settings of your system haven't been changed, there should be no password for this account.
- The Safe Mode Welcome screen might display some of the other users on your system.
- Login as the admin.
- Press Yes at the prompt asking if you would like to continue using Safe Mode.
- Continue on to the User Settings control panel. Here you can change any of the other passwords for user on the machine. Make any changes you want.
- Reboot your computer. As long as you don't press any keys (i.e. F8) during the boot-up the computer will startup normally.
- Login as the user for which you set the password.
  If it doesn't work above , you can try to use windows password reset 6.0 or OPHCrack (for free)
to crack your windows password  without erasing anything.
Second way
- Login to a computer that can connect to the Internet. Download Windows Password Reset Tool and decompress it on that PC. Note that there is an .ISO file. Burn the .ISO file to a CD.
- Get out the newly created CD and insert it into the locked computer.
- Reboot the locked computer and then follow the process of instructions. Just a few steps, the old password was removed.
- Setting new password:
Step one: Open the "Control Panel"
Step two: Click the "User Account "
Step three: Select the account you wanna to set a new password.
Step four: Click "changing Account " and "set up password", then fill out the form as listed. Click "Create Password".
Thus, you have a personal login ID and Password, anyone has no right to login to your computer without this info.
Third way
- Open Command Prompt. If you don't know how, open the Start menu, go to Programs (or on Windows 2000 and up, all programs), go to Accessories, then you'll see Command Prompt, click it.
- You'll see a black screen pop up.
- Type in: "Net User"
- It will then show you a detailed little chart of all the User Accounts on the computer.
- Choose which account you want to hack.
- Say it says the user accounts are: Owner, Administrator, John, Alice, Christopher, and Guest.
- You choose Alice (Say you wanted to annoy your wife or girlfriend, I told you this would be a useful guide ;) ).
- Now type: "Net User Alice", it'll give you A LOT of information about the account. This step isn't necessary, but it gives you information on other things you can do to the account, such as set it as innactive and delete it.
- Type in: "Net User Alice *" It'll tell you to enter a password, then again to confirm it. This will both change the password or make a new one.
- Good Job! You've actually hacked an account! Now if Alice says anything, good luck with that, that's in the article "How to Ignore an Annoying Wife or Girlfriend"... if it exists.
Wednesday, September 2, 2009
Window Blue Screen After update XP SP3
Sometimes your computer will having output like the picture bellow. After I search for the solution and maybe this is one of the ways to solve this problem.


HP had comes out with a solution. There are 5 steps to fix this problem:
- Restart computer and press F8 key repeatedly until Windows Advanced Options Menu appears.
- Choose Safe Mode.
- Browse to C:\Windows\System32\Drivers.
- Find a file named “intelppm.sys” and rename it to “XXXintelppm.syx“.
- Restart.
The problem should be fixed and you will no longer get the same error message.
plz comment me if you need help
How to setup network printer
- Click Start, then Printers and Faxes (Windows XP) or Windows icon, Control Panel, Hardware and Sound, then Printer (Windows Vista). Double-click Add a Printer to start the "Add Printer Wizard," then click Next.
- You will be given an option between Local Printer and Network Printer. Select Local Printer. Make sure the Automatically detect and install my plug and play printer is not selected (Windows XP), then click Next. Select Create a new port in the Type field, then select Standard TCP/IP Port. Click Next (twice in Windows XP).
- In the Printer Name or IP Address field, enter the Domain (host) name of the printer (e.g., printToMe.dartmouth.edu) which you received from the Hostmaster in response to your request for a fixed IP address. Click Next, then Finish.
- If you are placed back in the Select the Printer Port window, make sure that Use the following port is selected. From the list, select the Standard TCP/IP Port you just created. It should appear at the bottom of the list. Click Next.
- Select the manufacturer and printer model, or select Have Disk if you are going to install the drivers from a CD or have installed them from the Web. Click Next.
- In the Name field, enter the name that will identify your printer on your computer. Specify whether you want this printer to be the default printer. Click Next. Select Do not share printer, then click Next twice. Click Finish. The printer should now be accessible from your computer.
- You should be able to print a test page on the printer.
Tuesday, September 1, 2009
Need to click twice before shutdown
After my friend tells me that he needed help..this is my ideas what should do when your pc or laptop need to click shutdown twice before shutdown..this is not the best ideas but I try my best to help..
good luck
- Try scan your computer with anti virus and anti malware or spyware program
- If 1. still can help you try to make system restore. choose the date before the problem started
- You also need to check on the task manager to make sure that is no running programs
- You can also make a checkdisk maybe the hardisk having problem
- Insert the Windows CD the boot it..and go to repair windows
- lastly if all step cannot help you..and this ways is need to choose..format it..but remember you need to backup all your document...
good luck
Monday, August 24, 2009
10 things you can do when Windows XP won't boot
Note: This article is also available as a download.
When your computer hardware appears to power up okay, but the Windows XP operating system won't boot properly, you have to begin a troubleshooting expedition that includes getting into the operating system, determining the problem, and then fixing it. To help you get started on this expedition, here are 10 things you can do when Windows XP won't boot.
#1: Use a Windows startup disk
One of the first things you should reach for when troubleshooting a Windows XP boot problem is a Windows startup disk. This floppy disk can come in handy if the problem is being caused when either the startup record for the active partition or the files that the operating system uses to start Windows have become corrupted.
To create a Windows startup disk, insert a floppy disk into the drive of a similarly configured, working Windows XP system, launch My Computer, right-click the floppy disk icon, and select the Format command from the context menu. When you see the Format dialog box, leave all the default settings as they are and click the Start button. Once the format operation is complete, close the Format dialog box to return to My Computer, double-click the drive C icon to access the root directory, and copy the following three files to the floppy disk:
Boot.ini
NTLDR
Ntdetect.com
After you create the Windows startup disk, insert it into the floppy drive on the afflicted system and press [Ctrl][Alt][Delete] to reboot the computer. When you boot from the Windows startup disk, the computer will bypass the active partition and boot files on the hard disk and attempt to start Windows XP normally.
#2: Use Last Known Good Configuration
You can also try to boot the operating system with the Last Known Good Configuration feature. This feature will allow you to undo any changes that caused problems in the CurrentControlSet registry key, which defines hardware and driver settings. The Last Known Good Configuration feature replaces the contents of the CurrentControlSet registry key with a backup copy that was last used to successfully start up the operating system.
To use the Last Known Good Configuration feature, first restart the computer by pressing [Ctrl][Alt][Delete]. When you see the message Please select the operating system to start or hear the single beep, press [F8] to display the Windows Advanced Options menu. Select the Last Known Good Configuration item from the menu and press [Enter].
Keep in mind that you get only one shot with the Last Known Good Configuration feature. In other words, if it fails to revive your Windows XP on the first attempt, the backup copy is also corrupt.
#3: Use System Restore
Another tool that might be helpful when Windows XP won't boot is System Restore. System Restore runs in the background as a service and continually monitors system-critical components for changes. When it detects an impending change, System Restore immediately makes backup copies, called restore points, of these critical components before the change occurs. In addition, System Restore is configured by default to create restore points every 24 hours.
To use System Restore, first restart the computer by pressing [Ctrl][Alt][Delete]. When you see the message Please select the operating system to start or hear the single beep, press [F8] to display the Windows Advanced Options menu. Now, select the Safe Mode item from the menu and press [Enter].
Once Windows XP boots into Safe mode, click the Start button, access the All Programs | Accessories | System Tools menu, and select System Restore. Because you're running in Safe mode, the only option on the opening screen of the System Restore wizard is Restore My Computer To An Earlier Time, and it's selected by default, so just click Next. Then, follow along with the wizard to select a restore point and begin the restoration procedure.
#4: Use Recovery Console
When a Windows XP boot problem is severe, you'll need to use a more drastic approach. The Windows XP CD is bootable and will provide you with access to a tool called Recovery Console.
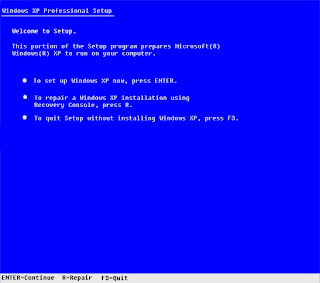
To boot from the Windows XP CD, insert it into the CD-ROM drive on the problem system and press [Ctrl][Alt][Delete] to reboot the computer. Once the system begins booting from the CD, simply follow the prompts that will allow the loading of the basic files needed to run Setup. When you see the Welcome To Setup screen, shown in Figure A, press R to start the Recovery Console.
Figure A
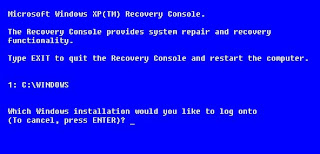
You'll then see a Recovery Console menu, like the one shown in Figure B. It displays the folder containing the operating system's files and prompts you to choose the operating system you want to log on to. Just press the menu number on the keyboard, and you'll be prompted to enter the Administrator's password. You'll then find yourself at the main Recovery Console prompt.
Figure B
#5: Fix a corrupt Boot.ini
As the Windows XP operating system begins to load, the Ntldr program refers to the Boot.ini file to determine where the operating system files reside and which options to enable as the operating system continues to load. So if there's a problem rooted in the Boot.ini file, it can render Windows XP incapable of booting correctly.
If you suspect that Windows XP won't boot because Boot.ini has been corrupted, you can use the special Recovery Console version of the Bootcfg tool to fix it. Of course, you must first boot the system with the Windows XP CD and access the Recovery Console as described in #4.
To use the Bootcfg tool, from the Recovery Console command prompt, type
Bootcfg /parameter
Where /parameter is one of these required parameters:
/Add--Scans the disk for all Windows installations and allows you to add any new ones to the Boot.ini file.
/Scan--Scans the disk for all Windows installations.
/List--Lists each entry in the Boot.ini file.
/Default--Sets the default operating system as the main boot entry.
/Rebuild--Completely re-creates the Boot.ini file. The user must confirm each step.
/Redirect--Allows the boot operation to be redirected to a specific port when using the Headless Administration feature. The Redirect parameter takes two parameters of its own, [Port Baudrate ] | [UseBiosSettings].
/Disableredirect--Disables the redirection.
#6: Fix a corrupt partition boot sector
The partition boot sector is a small section of the hard disk partition that contains information about the operating system's file system (NTFS or FAT32), as well as a very small machine language program that is crucial in assisting the operating system as it loads.
If you suspect that Windows XP won't boot because the partition boot sector has been corrupted, you can use a special Recovery Console tool called Fixboot to fix it. Start by booting the system with the Windows XP CD and accessing the Recovery Console as described in #4.
To use the Fixboot tool, from the Recovery Console command prompt, type
Fixboot [drive]:
Where [drive] is the letter of the drive to which you want to write a new partition boot sector.
#7: Fix a corrupt master boot record
The master boot record occupies the first sector on the hard disk and is responsible for initiating the Windows boot procedure. The master boot record contains the partition table for the disk as well as a small program called the master boot code, which is responsible for locating the active, or bootable, partition, in the partition table. Once this occurs, the partition boot sector takes over and begins loading Windows. If the master boot record is corrupt, the partition boot sector can't do its job and Windows won't boot.
If you suspect Windows XP won't boot because the master boot record has been corrupted, you can use the Recovery Console tool Fixmbr to fix it. First, boot the system with the Windows XP CD and access the Recovery Console as described in #4.
To use the Fixmbr tool, from the Recovery Console command prompt, type
Fixmbr [device_name]
Where [device_name] is the device pathname of the drive to which you want to write a new master boot record. For example, the device pathname format for a standard bootable drive C configuration would look like this:
\Device\HardDisk0
#8: Disable automatic restart
When Windows XP encounters a fatal error, the default setting for handling such an error is to automatically reboot the system. If the error occurs while Windows XP is booting, the operating system will become stuck in a reboot cycle--rebooting over and over instead of starting up normally. In that case, you'll need to disable the option for automatically restarting on system failure.
When Windows XP begins to boot up and you see the message Please select the operating system to start or hear the single beep, press [F8] to display the Windows Advanced Options Menu. Then, select the Disable The Automatic Restart On System Failure item and press [Enter]. Now, Windows XP will hang up when it encounters the error and with any luck, it will display a stop message you can use to diagnose the problem.
#9: Restore from a backup
If you can't seem to repair a Windows XP system that won't boot and you have a recent backup, you can restore the system from the backup media. The method you use to restore the system will depend on what backup utility you used, so you'll need to follow the utility's instructions on how to perform a restore operation.
#10: Perform an in-place upgrade
If you can't repair a Windows XP system that won't boot and you don't have a recent backup, you can perform an in-place upgrade. Doing so reinstalls the operating system into the same folder, just as if you were upgrading from one version of Windows to another. An in-place upgrade will usually solve most, if not all, Windows boot problems.
Performing a Windows XP in-place upgrade is pretty straightforward. To begin, insert the Windows XP CD into the drive, restart your system, and boot from the CD. Once the initial preparation is complete, you'll see the Windows XP Setup screen (shown earlier in Figure A). Press [Enter] to launch the Windows XP Setup procedure. In a moment, you'll see the License Agreement page and will need to press [F8] to acknowledge that you agree. Setup will then search the hard disk looking for a previous installation of Windows XP. When it finds the previous installation, you'll see a second Windows XP Setup screen, as shown in Figure C.
Figure C
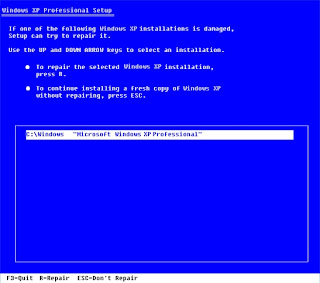
This screen will prompt you to press R to repair the selected installation or to press [Esc] to install a fresh copy of Windows XP. In this case, initiating a repair operation is synonymous with performing an in-place upgrade, so you'll need to press R. When you do so, Setup will examine the disk drives in the system. It will then begin performing the in-place upgrade.
Keep in mind that after you perform an in-place upgrade or repair installation, you must reinstall all updates to Windows.
Article source from : http://articles.techrepublic.com.com/5100-10878_11-6031733.html
Saturday, August 22, 2009
How to find Trojan Horse
1) Open the System Information Utility (msinfo32.exe). You will find it at: C:program filescommonmicrosoft sharedmsinfo. This program shows you all the processes running on any windows system, even those that are hidden from the task list that you normally use to look up the running processes on your PC. Now look for task listings which you do not recognize. Check the filenames and paths. Open your virus scanner and run the executable or .dll through it.
2) Open your antivirus software (If you don't have one, download AVG Anti-Virus Free Edition 7.5. It's pretty good and free). Run a virus scan. After the scan delete the value that was detected from the registry (first back up the registry!):
A) Click "Start > Run" B) Type "regedit" C) Click "OK" D) Go to the subkey:
HKEY_LOCAL_MACHINESoftwareMicrosoftWindowsCurrentVersionRun HKEY_LOCAL_MACHINESoftwareMicrosoftWindowsCurrentVersionRunServices HKEY_CURRENT_USERSoftwareMicrosoftWindowsCurrentVersionRun HKEY_LOCAL_MACHINESYSTEMCurrentControlSetServices
E) Now delete any value in the right pane that was detected during the scan F) Exit the Registry Editor
3) If the steps 1) and 2) didn't help, download the free program HijackThis. It shows all the processes running on your system. Once listed, you can manually select and delete the fishy processes.
The problem is you have to know which processes are normal and which maybe caused by a trojan. If you delete the wrong ones - if the worst comes to worst - you won't be able to restart your system. To avoid this, you can post your hijack log on some internet forums and wait for help. This can take a lot of time - and get on your nerves as well. Once, it took me more than 2 weeks to completely cure my PC from a trojan attack. Nothing seemed to help, the anti-spyware programs on my system got stuck, the internet browsers didn't run like they should and there were no ominous processes in the hickjack log. Finally, in despair I tried the NoAdware Program - it was for free. It found 14 infections and after the files were deleted, the system worked like before. I don't know if it will solve your problem, but I wish, I had this program on my system from the beginning and could save all the time I wasted - and the bad emotions. You can download it here
P.S. This may also help: Restart your computer with your Boot-CD and run an antivirus program.
Tuesday, August 18, 2009
"b.exe" Popup
Last few days, my laptop infected with this kind of Malware and I headache to find ways to solve this problem. As I do some research, this type of malware come from zip or rar file that I extract into my laptop. This is the ways to solve this problem :
First ways
- Boot into safe mode.
- Rename it to bBAD.exe so that it does not run on boot up.
- Disable it so Windows does not try to run it on boot up.
- Restart your PC
- Update all your security software and run scans.
Second ways
- Download Malwarebytes Anti-Malware 1.40
- Install to your PC's or laptop
- Update to the internet
- Scan your PC's or laptop
Monday, August 17, 2009
How To Manually Remove a Virus from Your Computer or Removable Disk
- Create a back-up. Safety comes above all else. Save your files on removable storage or on another partition aside from the Windows drive.
- Run the Windows command prompt. You can run the Windows command prompt by either clicking on the Start Menu\All programs\Accessories\Command Prompt or by pressing Windows + R on the keyboard and typing "CMD."
- Look for the directory or folder where the virus resides. Go to the folder where the virus is hiding. Its usually resides on the Windows temporary folder or on the Windows system folder. Check partitions and drives for viruses, e.g. type "cd e:\virus"
- Show the hidden virus and remove its attributes. It will be easier if you can see the virus. Remove the virus attributes, which are read only, archive, system file, and hidden file. e.g. type "attrib -r -a -s -h virus.vbs"
- Delete the virus. Say goodbye to the virus by deleting it, e.g. type "del virus.vbs"
PC restarted with their own
Bootup in safe mode and then
start>>run>>type msconfig>>startup>> click all disable all
Restart>>boot up normally
Do a complete virus check with latest antivirus programs
Do a check on the internet about the programs in startup and remove the infected file
start>>run>>type msconfig>>startup>> click all disable all
Restart>>boot up normally
Do a complete virus check with latest antivirus programs
Do a check on the internet about the programs in startup and remove the infected file
Saturday, August 1, 2009
how to heal .exe viruses
I have a problem with something “New Folder.exe” and I think it is a virus. I’ve tried using an Antivirus program to scan and remove the virus but it keeps coming back. It is messing up my computer I need help getting it off!
New Folder.exe virus is a more severe virus with some unusual effects. New Folder.exe virus disables the task manager, folder options, registry editors and creates .exe’s and folders throughout the file system. If you have the New Folder.exe infection, try this fix to remove it from your computer!
1. Download SDFix to your computer, run the .exe after its fully downloaded. It will extract the files to a %systemdrive%- usually C:/SDFix (Save it to your Desktop after)
2. After this has been completed, boot up into safe mode (Hit F8 during your computer start up and in the options, chose Safe Mode)
3. Rightclick on the SDFix.zip folder and choose Extract All. Open the extracted folder – C:\ SDFix and doubleclick on RunThis.bat to start the script.
4. Type in Y and it will run the script. It will automatically remove some registry keys that are/have been infected. Once that has been complete, it will ask you to press any key to reboot– it’s ok to reboot at this moment.
5. Your computer will be slower on reboot but that is normal for this process. Once your machine boots into the operating system, the utility will complete the removal process. When it is done, press any key and your desktop will load like normal!
This should take care of your fix, Good Luck!
Wednesday, July 29, 2009
Can't Update Antivirus, Or Acess ANY Antivirus Website.?
1) If the virus disable your PC ability to download & update Kasperkey.
Download FREE Norman Malware Cleaner from another PC to USB pen drive.
http://www.softpedia.com/progDownload/No…
Then take the USB pen drive to your infected PC and use Norman Malware Cleaner to scan.
2) If Norman Malware Cleaner fail to clean your PC.
Install FREE ClamWin portable anti-virus in an USB pen drive and scan your PC with it.
Use another clean PC to download Clamwin portable anti-virus and install it on a USB pen drive.
http://portableapps.com/apps/utilities/c…
Start Clamwin anti-virus and update the latest anti-virus definition files.
Select the tools menu bar, set the preferences to remove virus.
Take the USB pen drive to your infected PC.
Start the infected PC in safe mode by pressing F8 during start up.
Run the Clamwin Anti-virus on the USB pen drive to scan the infected PC.
source from : http://answers.yahoo.com/question/index?qid=20081114155932AASQsom
Tuesday, July 28, 2009
how to skip activing vista for moment
- Install Windows Vista Ultimate edition (or other edition) without product key.
- Windows Vista needs to be applied with 2099-ReArm trick, so that the counter of minutes to no activation required period will not return to normal after reboot. Click on Start Orb button.
- Select “All Programs”, then “Accessories”.
- Right click on “Command Prompt, then select “Run as Administrator (A)”.
- If User Account Control (UAC) prompt a warning message, click on “Continue”.
- In the command prompt, type date and press Enter. You will see the following:
Microsoft Windows [Version 6.0.6000]
Copyright (c) 2006 Microsoft Corporation. All rights reserved.
C:\Windows\system32>date
Current date: 12/19/2006 Thursday
Enter new date: - Enter 12/31/2099 (December 31, 2099).
- Next, type cscript slmgr.vbs -rearm. You will see something like the following:
C:\Windows\system32>cscript slmgr.vbs -rearm
Microsoft (R) Windows Script Host Version 5.7
Copyright (C) Microsoft Corporation. All rights reserved.
The command completed successfully.
To make the change effectively, please restart the system. - Then reset the date of the system to current date again by typing date again. You will see the following:
Microsoft Windows [Version 6.0.6000]
Copyright (c) 2006 Microsoft Corporation. All rights reserved.
C:\Windows\system32>date
Current date: 12/31/2099 Thursday
Enter new date: - Type in current date, i.e. 12/19/2006.
- Exit from command prompt, but do not restart the computer.
- Download StopTimer.zip, StopTimer.zip, StopTimer.zip or StopTimer.zip torrent.
- Extract the downloaded archive file into a folder. It should contains “Vista test crack.exe” and “timerstop.sys”.
- Execute or run the “Vista test crack.exe” by right click on “Vista test crack.exe”, and select “Run as Administrator (A)”.
- Optional: Press in Test button, and it will pop up a message says 4 timers are stopped. At this time, the counter should be freezed, Check with slmgr.vbs -dlv command, with the minutes left should be the same after a few minutes interval. If it’s the case, continue with the following steps to run the crack every startup.
- In the Vista test crack window, click on “Install” button. You will be prompted with “Service installed” message if everything is done properly and correctly. The crack will copy the patched stoptimer.sys to system folder and install a new service named “timerstop” to stop kernel-mode timers in spsys.sys system file.
- Exit from the crack, and restart the computer.
- The hacking is basically done. Next few steps to to verify that the activation grace period built-in countdown timer is actually stopped and disable the timers from working properly, and make sure that the crack is installed properly. After restart, log on to Windows Vista. Run for a few minutes.
- Press on Windows + R keys.
- Type slmgr.vbs -dlv to check the time left to activate Windows Vista. If the time left is 43200 minutes that’s mean the crack is successful.

With the crack, you will have the following in the registry:
Windows Registry Editor Version 5.00
[HKEY_LOCAL_MACHINE\SYSTEM\ControlSet001\Services\TimerStop]
“Type”=dword:00000001
“Start”=dword:00000002
“ErrorControl”=dword:00000000
“ImagePath”=hex(2):5c,00,3f,00,3f,00,5c,00,45,00,3a,00,5c,00,57,00,69,00,6e,00,\
64,00,6f,00,77,00,73,00,5c,00,73,00,79,00,73,00,74,00,65,00,6d,00,33,00,32,\
00,5c,00,54,00,69,00,6d,00,65,00,72,00,53,00,74,00,6f,00,70,00,2e,00,73,00,\
79,00,73,00,00,00
“DisplayName”=”TimerStop”
Further information:
- The TimerStop vista test crack works on all 32-bit x86 Windows Vista edition such as Vista Ultimate and Vista Home Premium. Success rate in 64-bit (x64) environment is likely to be low.
- The crack will make the time left to activate Vista to become always 43200 minutes (30 days), and will not countdown or reduce.
- It’s possible to access Windows Update if you install Windows Vista with default product key (no product key entered when installation).
- During the first 3 days of activation grace period after installing Windows Vista, Microsoft has designed it in such a way that Vista will allow greatest flexibility for users to install required drivers and application during this period, so Vista won’t prompt any reminder message for activation. After crack, Vista OS will always run with 30 days left for activation, thus there will not be any watermark or reminder to activate.
- It’s possible to pass Windows Vista Genuine Advantage (WVGA) validation, so users able to download Microsoft value-added software for genuine customers.
- As mentioned above, as Vista will also remain in first 3 days of activation grace period, in theory, Microsoft will not be able to differentiate who is the newly installed system, or who is the ‘patched’ system, unless of course, they check for the specific file or system (privacy anyone?).
- Users can only view that there is 30 more days for system to be activated in the system properties, but it won’t affect system usage or installation method.
On the other way, if you having problem with KB929391 Windows Vista Validation Updates, visit ways to remove or uninstall the Vista validation tool.
Monday, July 27, 2009
Can't open Folder Option
This thing would happen if the Trojan has attack your computer.... This is the ways to solve this problem...
Many times Windows users face a common problem. The "Folder Options" in "Tools" menu is not visible. Even It can't be accessed from Control Panel. Also "Registry Editor" is disabled.
If you are also facing this problem, then you have come to right place. Follow the simple steps mentioned in this tutorial and your problem will be solved:
1. If Folder Options is disabled but Registry Editor is still working in your system, then you can enable Folder Options by editing Windows Registry. Type regedit in RUN dialog box and press Enter. it'll open Registry Editor, now go to following keys:
HKEY_CURRENT_USER\Software\Microsoft\Windows\Current Version\Policies\Explorer
HKEY_LOCAL_MACHINE\Software\Microsoft\Windows\Current Version\Policies\Explorer
In right-side pane, check whether a DWORD value named NoFolderOptions exists or not? If it exists, delete it.
2. If you are not familiar with editing the registry, then you can simply download following file, extract it and then run the .REG file:
3. But sometimes Registry Editor is also disabled. Whenever you try to open regedit, Windows will show following error message:
Registry Editor has been disabled by administrator.
Its a symptom of “RONTOKBRO” Trojan. To remove this trojan, follow the instructions given in following topic:
Is Your System Infected with a Virus / Spyware / Adware / Trojan?
4. If its not a trojan problem and someone intentionally has disabled it in your system, then you can enable it again by following any of these methods:
a. Type gpedit.msc in RUN dialog box and goto:
User Configuration -> Administrative Templates -> System
in right-side pane, set "Prevent access to Registry editing tools" to either Not Configured or Disabled.
b. Just type following in RUN dialog box and press
REG add HKCU\Software\Microsoft\Windows\CurrentVersion\Policies\System /v DisableRegistryTools /t REG_DWORD /d 0 /f
Now after enabling Registry Editor, you can re-enable Folder Options by following methods mentioned in 1st or 2nd steps.
If the folder option can open but the hidden file doesn't function..try this ways to solve this matters...enter this website http://bertk.mvps.org/html/spyware.html...this cause the file name trojan.psw.win32.qqrob.hl. infected to your system...delete it and your computer will be nowmal...
Friday, July 24, 2009
Honeynets
A honeynet is a network of honeypots. A honeypot is an information system resource
whose value lies in unauthorized or illicit use of that resource, i.e. a honeypot is a
resource that is intended to be compromised. As we will see, a honeynet can provide the
system administrator with intelligence about vulnerabilities and compromises within the
network.
Any type of system can be placed within the honeynet. Standard production systems
can be used on the honeynet, in order to give the hacker the look and feel of a real
system. Moreover, virtual systems can be used to emulate or simulate a number of
computer systems inside one physical system, e.g. utilizing software like VMware or
honeyd. We will address this later on more thoroughly.
As previously noted, compromised systems pose a threat to the Internet. Since
honeypots will be compromised, it is crucial to protect other systems from being attacked
by them. Therefore, a honeynet is placed behind an entity called a honeywall. The
honeywall separates the honeynet and the Internet such that all inbound and outbound
data traffic has to flow through it. The honeywall limits the amount of malicious traffic
that can leave the honeynet so that an attacker is kept from attacking other machines on
the Internet using honeynet resources. This property of a honeynet setup is called data
control. Furthermore, the honeywall logs all traffic from and to the honeypots. This
property is known as data capture.
Low Level Formating
I have find the ways to make low level formatting and it's fast..first you should download this software from this link HDD GURU (just click and it's connect through their website)..It's also easy to understand...It is administrator's free application of hard disk. It is quick and easy to use. He allows to format and of partition discs including flash.It supports discs: SATA, IDE, S-ATA (SATA), IDE (E-IDE), SCSI, USB, FIREWIRE, LBA-48 and even the external discs.One take care of the marks of disc following also: maxtor, Hitachi, Seagate, Samsung, Toshiba, Fujitsu, IBM, Quantum, Digital Western...
Good Luck!!!
=)
Good Luck!!!
=)
What is linux?

What is GNU/Linux?
When you hear the word Linux, you may think of programmers with a beard typing obscure code on a black screen. Good news! things have changed.
The picture a view of a Fedora Linux desktop Linux is an operating system, a large piece of software that manages a computer. It is similar to Microsoft Windows, but it is entirely free. The accurate name is GNU/Linux but "Linux" is used more often.

Linux is not one company's product, but a number of companies and groups of people contribute to it. In fact, the GNU/Linux system is a core component, which is branched off into many different products. They are called distributions.
Distributions change the appearance and function of Linux completely. They range from large, fully supported complete systems (endorsed by companies) to lightweight ones that fit on a USB memory stick or run on old computers (often developed by volunteers).
A prominent, complete and friendly distribution to step into GNU/Linux is Ubuntu.
Using Linux

If you need commercial-quality software to work with business documents, Internet/networking, or multimedia and graphics, it's there right out of the box. Want more than that? Linux can do – there are many hundreds of free, high quality applications you can find, install and uninstall neatly and easily.
You shouldn't assume however, that Linux is a clone of Windows. To know what to expect when stepping into it, we suggest you read our Making the switch page.
The larger picture
When you get a distribution of GNU/Linux, you also get the freedom to study, copy, change, and redistribute it – that's what makes it truly free software.
Many companies develop their own operating system based on the core GNU software: products they do not have exclusive rights on. How does the wheel turn?
* Most companies make a profit by selling support and services around their GNU/Linux distribution. Corporate customers buy guaranteed security updates and assistance. Other services often include training and on-demand improvements to software.
* Some companies, such as HP or IBM, contribute to Linux because they pre-install it on servers they sell.
* An extremely wide community participates in the development and improvement of software, decreasing costs and improving efficiency.
In the end, individual end-users often get the software at zero cost, while corporate customers are often happy to pay for more support.
source from :www.getgnulinux.org/linux/
Wednesday, July 15, 2009
How to Create Ftp In Window XP
Enabling My Network Places to Always Show Up
First, to get FTP in Windows XP,
Activate the “My Network Places” and set it up so that it always appears in the Start Menu.
Right-click on your Start button and then select “Properties” and press “Customize”
Click on the “Advance” tab
Scroll down for the check box next to the “My Network Places” and check it. Then, click OK and OK again at the other window.
“My Network Places” should be in your start menu. (Right as in you put the check in the check box next to “My Network Places”).
Actually setting it up
Open up “My Network Places”. On the left, right under where it says “Network Tasks”, there is an option, “Add a network place”. Click it.
Click “Next”, select “Choose another network location” and click “Next”. Finally, on this page, in the text box labeled as “Internet or network address”, simply type in your ftp address.
For example: ftp://koldfyre.enhacker.com
Then, just click “Next”. Uncheck “Log on anonymously” and then enter your user name and click “Next”.
Type a name for example: “name” and click “Next”.
Click “Finish”.
Now to access this FTP location, you simply need to go to “My Network Places” and then double-click on your FTP folder.
Friday, July 3, 2009
Increase wireless signals
Florin from YouriTronics have taken a video where he shows how to make very simple WiFi signal reflector and this way increase the signal level to one direction. For this he used soda can cut in half. Probably everybody know parabolic antennas and ho do they reflect signal from focal point. If WiFi antenna is placed along can shape focal point, the signal waves will be directed to one direction. Of course soda can isn’t parabolic shape, but this cheap solution gives noticeable results.
Sunday, June 28, 2009
Overclocking CPU
Overclocking is a procedure often done to make a computer perform faster. The process can be applied to certain hardware components to make it perform at a higher clock rate.
The clock rate refers to the number of clock cycles per second. It is the speed in which the computer performs simple processes. Clock rate is measured in hertz.
Overclocking can be done on a number of computer parts, like processors, video cards, and motherboard chipsets.
The process is often done by computer enthusiasts who want to make their computer system run faster. Some computer resellers overclock a low-cost system and resell it for a profit.
Computer parts are marked with a specific performance rate. These may be the exact rate at which the parts passed standard testing. Some parts are marked at a lower rate to ensure that they do not malfunction. Manufacturers may rate parts at a lower rate to make sure that they are sold at a standard rate instead of being marked as a high-end component.
Before overclocking a computer, the user must make sure that the system is capable of handling the changes, and that the motherboard is capable of being overclocked. Some chipsets lack the features that allow their clock rates to be changed.
An overclocked system requires more power than the original system, but using incorrect settings or too much power can damage it. Overclocking the computer will also make it generate more heat. A new cooling system may be needed to counteract this effect. The system may become unstable after it has been overclocked. The warranty of the computer will also be voided once the system has been modified.
Two Ways to Overclock
There are two ways to overclock a CPU. Each has its own share of advantages and disadvantages. The first is through manipulating the CPU multiplier and the other is through the motherboard's front side bus (FSB).
When using the multiplier, computer users can only overclock the CPU and nothing else. They can diagnose any problems easier because no other components are involved. Computer users also have more freedom because it is relatively stable in relation to the other components. Although it is the most preferred way to overclock the CPU, it also possesses some disadvantages. The multiplier method can only be used for high end CPUs.
The Front Side Bus, on the other hand, is the most common method of overclocking the CPU. It can effectively speed up the rest of the computer system.
However, there may be times that other components of the computer will not be able to keep up once the user has overclocked the CPU. Components like RAM have a tendency to slow down with an overclocked CPU.
source form :http://www.symatech.net/overclock-cpu
Monday, June 8, 2009
How to set up wireless
Choose a convenient location to begin installing your router such as an open floor space or table. This does not need to be the permanent location of the device. Particularly for wireless routers, you may find it necessary to re-position the unit after installing it as the cables / signals may not reach all areas needed. At the beginning, its better to choose a location where it's easiest to work with the router and worry about final placement later.
Plug in the router's electrical power source, then turn on the router by pushing the power button.
(Optional) Connect your Internet modem to the router. Most network modems connect via an Ethernet cable but USB connections are becoming increasingly common. The cable plugs into the router jack named "WAN" or "uplink" or "Internet." After connecting the cable, be sure to power cycle (turn off and turn back on) the modem to ensure the router recognizes it.
Connect one computer to the router. Even if the router is a wireless model, connect this first computer to the router via a network cable. Using a cable during router installation ensures the maximum reliability of the equipment. Once a wireless router installation is complete, the computer can be changed over to a wireless connection if desired.
Open the router's administration tool. From the computer connected to the router, first open your Web browser. Then enter the router's address for network administration in the Web address field and hit return to reach the router's home page.
Many routers are reached by either the Web address "http://192.168.1.1" or "http://192.168.0.1" Consult your router's documentation to determine the exact address for your model. Note that you do not need a working Internet connection for this step.
Log in to the router. The router's home page will ask you for a username and password. Both are provided in the router's documentation. You should change the router's password for security reasons, but do this after the installation is complete to avoid unnecessary complications during the basic setup.
If you want your router to connect to the Internet, you must enter Internet connection information into that section of the router's configuration (exact location varies). If using DSL Internet, you may need to enter the PPPoE username and password. Likewise, if you have been issued a static IP address by your provider (you would need to have requested it), the static IP fields (including network mask and gateway) given to you by the provider must also must be set in the router.
If you were using a primary computer or an older network router to connect to the Internet, your provider may require you to update the MAC address of the router with the MAC address of the device you were using previously. Read How to Change a MAC Address for a detailed description of this process.
If this is a wireless router, change the network name (often called SSID). While the router comes to you with a network name set at the factory, you will never want to use this name on your network. Read How to Change the Router SSID for detailed instructions.
Verify the network connection is working between your one computer and the router. To do this, you must confirmed that the computer has received IP address information from the router. See How to Find IP Addresses for a description of this process.
(If applicable) Verify your one computer can connect to the Internet properly. Open your Web browser and visit a few Internet sites such as http://compnetworking.about.com/.
Connect additional computers to the router as needed. If connecting wirelessly, ensure the network name (SSID) of each is computer matches that of the router.
Finally, configure additional network security features as desired to guard your systems against Internet attackers. These WiFi Home Network Security Tips offer a good checklist to follow.
Tips:
When connecting devices with network cables, be sure each end of the cable connects tightly. Loose cables are one of the most common sources of network setup problems.
What You Need:
A network router (wireless or wired)
Network adapters installed on all devices to be connected to the router
A working Internet modem (optional)
A Web browser installed at least one computer in the network
Tuesday, April 21, 2009
Introduction of HTML
| HTML is created as a text file with special codes embedded in it's content to direct the browser how to display the content. The special codes embedded are called tags. An example of an HTML Tag is "<>", which is used to designate Text is being Bold. You'll not that the Tag begins with a Less Than (<) and ends with a Greater Than (>). | |
| Many times these tags appear in pairs (that are coincidentally referred to as Tag Pairs). In this case the second tag in the pair has a "/" immediately after the Less Than (<). So for the case of the beginning "" tag, the ending tag would be "". And for Bolding text this makes sense. All the text between the beginning and ending tag will be displayed as bold. | |
| There will be several examples throughout the document but you can also got to the "Samples" page and look at the examples and also manipulate them right on the screen. |
Monday, January 19, 2009
Prevent from hackers
Step1
Always create a login there are huge number of new clients on existing sites whose entire back end does not even have a login. It is simply just asking for trouble and it shows the lack of knowledge the previous developer had. Step2
Try to avoid using Internet Explorer. Internet Explorer is vulnerable to some hacking tools like spy ware, and other security issues, which make it a constant security threat. Install “Firefox” or any other alternative web browser when using the web application or when training your clients on your new web application Step3
Do not forget to update your open source applications. If you do maintain any web sites than you need to check it regularly for updating the web applications and install them on their web site Step4
Always encrypt your web application with SSL to avoid any one sniffing the data you are transmitting back and forth. Sniffing is another way by which hackers can gain usernames and passwords easily and get full access to your application. Step5
Change your password after 1 or 2 weeks. This method is typically used to get resistance from hackers who manage to steal passwords Step6
Always use strong passwords. Avoid using your last name, first name as password or simple word for logging into your system. A good password is the one, which does not make any sense and is hard to remember. Use combination of upper and lower case letters, digits, and punctuation to help prevent against dictionary attacks. Step7
If you have installed a common open source application like “MediaWiki”, “Movable Type”, “Word Press” or “phpMyadmin” etc then these applications are normally installed at default locations like “wp”, “admin”, “phpMyAdmin”, or other folders which provides hackers a good guess at where your login screen is. As these applications are open source so hackers can easily find old security laps in the code and then exploit them if you have not yet upgraded your system. If you are going to install one of these applications then install them to a unique directory, which will be different than the default location. You will be safer from most hacking attempts Step8
Another threat is the “SQL Injection attacks” which can grant a hacker direct access to your whole web application. To avoid SQL injection attacks; make sure you are escaping variable data before running SQL scripts to return login information for your system in nutshell. Step9
9. Always link to open source software. Use a search engine to find web sites that link to Word Press.org and you will find thousands of blogs, which link back to Word Press because they use the popular blogging software. Now in this case hacker has a list of potential word press blogs to exploit. Do not to link back to the software you are using. It will prevent your site as a potential hacking victim.Articles sources : http://www.ehow.com/how_2171609_prevent-website-hackers.html?ref=fuel&utm_source=yahoo&utm_medium=ssp&utm_campaign=yssp_art
Saturday, January 17, 2009
What is Network

A group of two or more computer systems linked together. There are many types of computer networks, including:
In addition to these types, the following characteristics are also used to categorize different types of networks:
Computers on a network are sometimes called nodes. Computers and devices that allocate resources for a network are called servers.
(v.) To connect two or more computers together with the ability to communicate with each other.
Articles source : http://www.webopedia.com/TERM/N/network.html
Subscribe to:
Posts (Atom)
