- to download this taskbar tool click Here...
- if you can't fix this problems try to use window CD to repair the problem.
- refer to this website Click Here
- If all the step can't help you anbd there is no other ways, you need to make a backup and format.
Followers
Sunday, September 27, 2009
Missing Start Menu
I found this way to solve your problem..
Thursday, September 10, 2009
Problem with office?
Microsoft now offers an in-house physician. MS Diagnostics is a tool included with the Microsoft Office2007 system that runs a battery of tests which can let you know about the problems and help you with ways that to solve them. You must have run into Microsoft Office2003’s Detect and Repair features; MS Office Diagnostics is like a MRI Scan to the former’s X-ray. It gives a more thorough run over to your system with better repair choices.
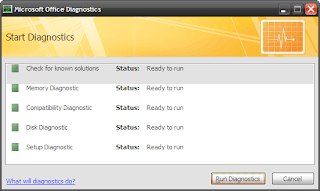
MS Diagnostics sizes up your system by running these scans,
* Setup Diagnostic
Files and the registry are scanned for glitches commonly caused by viruses and faulty installations. This test can take up to 15 minutes or more as it goes into the very nerve center of the computer.
* Disk Diagnostic
This diagnostic test scans the hard disk for potential problems. It looks at the Windows system event log and the SMART (Self-Monitoring, Analysis and Reporting Technology) feature of your hard disk if available. This test is sure to let you know if the hard disk is headed for a crash.
* Memory Diagnostic
This checks up on the stability of the RAM.
* Update Diagnostic
This is an update check – does your computer and your Office suite have all the updates installed? It is important as official updates smoothen out the bugs and make the system more stable. This test is available only if Check for Updates is enabled for the Office suite.
* Compatibility Diagnostic
Sometimes you may have different versions of the same Office application installed or conflicting DLL files might be causing the errors. The compatibility test checks for this and nails the problem factor.
* Check for known solutions
This test uses the vast database of Microsoft’s crash cases and their possible solutions to offer a similar for you after reviewing the crash reports on your system.
Now, let’s diagnose…
Though it sounds like a very serious piece of work, in practice it’s not. That’s a hurrah for Microsoft’s user friendliness. Before running the tests, close all open programs and avoid using the computer for the duration of the check-up.
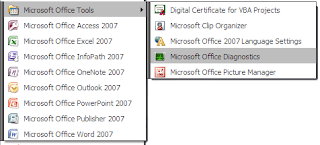
1. MS Office Diagnostic can be found under the MS Office tools group menu.
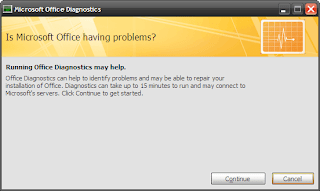
2. MS office Diagnostic window opens to inform the user that the test may take up to 15 minutes and also connect to Microsoft’s servers. Click on continue.
3. This window displays the tests that will be carried out. Begin the scan by clicking on Run Diagnostic.
4. The diagnostics will run one by one and notify you of any glitches detected. This should ideally complete in less than 10-15 minutes if there aren’t any errors.
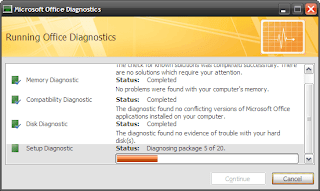
5. At the end of the diagnostic run, a summary of results is displayed. Here, perhaps is the only significant catch in the tool – it does not give the specific error. The diagnostic tool can make some repairs to the installation. Clicking on continue will connect you to Microsoft’s vast information resource of problems and solutions. You can follow its recommendations to resolve an error if the repairs fail.
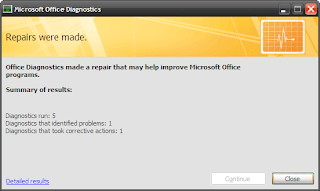
The above steps diagnose the entire Office suite. To save time, you can shortcut the process and have the tool check up on a single Office application. For instance,
* Diagnostics on MS Word can be accessed from: Microsoft Office Button – Word Options – Resources
Similarly for MS Excel/MS Access/MS PowerPoint, the tool can be accessed from: Microsoft Office Button – [Office Suite] Options – Resources
* For the others like MS Outlook/MS Visio/MS SharePoint Designer/MS Project/MS Publisher, the path is: Help – Office Diagnostics
Note: If all the above options fail to open MS Diagnostics, you can access the application directly from its location – C:\Program Files\Common Files\Microsoft Shared\OFFICE12\ offdiag.exe
After a run of MS Diagnostic tool, the problem may or may not get resolved. But Microsoft Diagnostics packs in a rapid detect and fix mechanism which gives us a ‘crash’ course in Office repair.
Missing languange bar
You may be able to restore your language bar with the following registry entries (place the following lines in a file called fix.reg and use that.):
Windows Registry Editor Version 5.00
[HKEY_CLASSES_ROOT\CLSID\{540D8A8B-1C3F-4E32-8132-530F6A502090}]
@="Language bar"
"MenuTextPUI"="@%SystemRoot%\\System32\\msutb.dll,-325"
[HKEY_CLASSES_ROOT\CLSID\{540D8A8B-1C3F-4E32-8132-530F6A502090}\Implemented Categories]
[HKEY_CLASSES_ROOT\CLSID\{540D8A8B-1C3F-4E32-8132-530F6A502090}\Implemented Categories\{00021492-0000-0000-C000-000000000046}]
[HKEY_CLASSES_ROOT\CLSID\{540D8A8B-1C3F-4E32-8132-530F6A502090}\InProcServer32]
@="C:\\WINDOWS\\system32\\msutb.dll"
"ThreadingModel"="Apartment"
[HKEY_CURRENT_USER\Software\Microsoft\Windows\CurrentVersion\Policies\Explorer]
"NoSaveSettings"=dword:00000000
[HKEY_CURRENT_USER\Software\Microsoft\CTF\LangBar]
"ShowStatus"=dword:00000004
Saturday, September 5, 2009
How to enter you computer if forgot password
First way
Second way

- Reboot your machine.
- Press F8 before the Windows boot screen appears.
- Do not press F5 as used on the NT/9x series of Windows.
- You will be be prompted with a boot options menu.
- Select the Start Windows in Safe Mode option.
- Click through several self-explanatory screens until your reach the familiar 'Welcome' screen.
- Note that this welcome screen is limited to 256 colors and 640x480 resolution because the primary graphics will have been set to the Windows Safe Mode software VGA adapter. You will not be able to change this mode even in Display options, while Windows is running in Safe Mode.
- Find the icon for the Administrator user. If the default settings of your system haven't been changed, there should be no password for this account.
- The Safe Mode Welcome screen might display some of the other users on your system.
- Login as the admin.
- Press Yes at the prompt asking if you would like to continue using Safe Mode.
- Continue on to the User Settings control panel. Here you can change any of the other passwords for user on the machine. Make any changes you want.
- Reboot your computer. As long as you don't press any keys (i.e. F8) during the boot-up the computer will startup normally.
- Login as the user for which you set the password.
  If it doesn't work above , you can try to use windows password reset 6.0 or OPHCrack (for free)
to crack your windows password  without erasing anything.
Second way
- Login to a computer that can connect to the Internet. Download Windows Password Reset Tool and decompress it on that PC. Note that there is an .ISO file. Burn the .ISO file to a CD.
- Get out the newly created CD and insert it into the locked computer.
- Reboot the locked computer and then follow the process of instructions. Just a few steps, the old password was removed.
- Setting new password:
Step one: Open the "Control Panel"
Step two: Click the "User Account "
Step three: Select the account you wanna to set a new password.
Step four: Click "changing Account " and "set up password", then fill out the form as listed. Click "Create Password".
Thus, you have a personal login ID and Password, anyone has no right to login to your computer without this info.
Third way
- Open Command Prompt. If you don't know how, open the Start menu, go to Programs (or on Windows 2000 and up, all programs), go to Accessories, then you'll see Command Prompt, click it.
- You'll see a black screen pop up.
- Type in: "Net User"
- It will then show you a detailed little chart of all the User Accounts on the computer.
- Choose which account you want to hack.
- Say it says the user accounts are: Owner, Administrator, John, Alice, Christopher, and Guest.
- You choose Alice (Say you wanted to annoy your wife or girlfriend, I told you this would be a useful guide ;) ).
- Now type: "Net User Alice", it'll give you A LOT of information about the account. This step isn't necessary, but it gives you information on other things you can do to the account, such as set it as innactive and delete it.
- Type in: "Net User Alice *" It'll tell you to enter a password, then again to confirm it. This will both change the password or make a new one.
- Good Job! You've actually hacked an account! Now if Alice says anything, good luck with that, that's in the article "How to Ignore an Annoying Wife or Girlfriend"... if it exists.
Wednesday, September 2, 2009
Window Blue Screen After update XP SP3
Sometimes your computer will having output like the picture bellow. After I search for the solution and maybe this is one of the ways to solve this problem.
HP had comes out with a solution. There are 5 steps to fix this problem:
- Restart computer and press F8 key repeatedly until Windows Advanced Options Menu appears.
- Choose Safe Mode.
- Browse to C:\Windows\System32\Drivers.
- Find a file named “intelppm.sys” and rename it to “XXXintelppm.syx“.
- Restart.
The problem should be fixed and you will no longer get the same error message.
plz comment me if you need help
How to setup network printer
- Click Start, then Printers and Faxes (Windows XP) or Windows icon, Control Panel, Hardware and Sound, then Printer (Windows Vista). Double-click Add a Printer to start the "Add Printer Wizard," then click Next.
- You will be given an option between Local Printer and Network Printer. Select Local Printer. Make sure the Automatically detect and install my plug and play printer is not selected (Windows XP), then click Next. Select Create a new port in the Type field, then select Standard TCP/IP Port. Click Next (twice in Windows XP).
- In the Printer Name or IP Address field, enter the Domain (host) name of the printer (e.g., printToMe.dartmouth.edu) which you received from the Hostmaster in response to your request for a fixed IP address. Click Next, then Finish.
- If you are placed back in the Select the Printer Port window, make sure that Use the following port is selected. From the list, select the Standard TCP/IP Port you just created. It should appear at the bottom of the list. Click Next.
- Select the manufacturer and printer model, or select Have Disk if you are going to install the drivers from a CD or have installed them from the Web. Click Next.
- In the Name field, enter the name that will identify your printer on your computer. Specify whether you want this printer to be the default printer. Click Next. Select Do not share printer, then click Next twice. Click Finish. The printer should now be accessible from your computer.
- You should be able to print a test page on the printer.
Tuesday, September 1, 2009
Need to click twice before shutdown
After my friend tells me that he needed help..this is my ideas what should do when your pc or laptop need to click shutdown twice before shutdown..this is not the best ideas but I try my best to help..
good luck
- Try scan your computer with anti virus and anti malware or spyware program
- If 1. still can help you try to make system restore. choose the date before the problem started
- You also need to check on the task manager to make sure that is no running programs
- You can also make a checkdisk maybe the hardisk having problem
- Insert the Windows CD the boot it..and go to repair windows
- lastly if all step cannot help you..and this ways is need to choose..format it..but remember you need to backup all your document...
good luck
Subscribe to:
Posts (Atom)
